Additional fields on the booking form
Additional fields let you collect extra information from clients during booking — such as a child's date of birth, address, allergies, or business invoicing details. You configure them per programme in the Additional Fields tile.
Additional fields are a standard part of the booking form, available on every plan. If you cannot find them, check the navigation below rather than your subscription.
Navigation: Go to Programmes → select a programme → Edit Settings → Additional Fields.
Enabling additional fields
- Open the programme's settings.
- Click Edit on the Additional Fields tile.
- Check Extend booking form with additional fields.
- Configure the fields you need (see below).
- Save.
Once enabled, the selected fields appear on the booking form for this programme.
Note: Additional fields are configured at the programme level. If you use the same fields across multiple programmes, configure one programme first and then use Copy programme to duplicate the settings.
Built-in fields
These fields are ready to use — you just enable them and optionally set a custom label.
| Field | Description | Notes |
|---|---|---|
| Date of birth | Client's or child's date of birth. | Can be used for age restriction (see below). |
| Child's full name | Full name of the child (for children's programmes). | Shown when the "For children" setting is active. |
| Citizenship | Country of citizenship, selected from a dropdown. | Stored as an ISO 3166-1 country code. Recommended countries for your region are shown first. Syncs to the client profile — updating it on one registration updates the client record. |
| Address | Client's address. | Choose Simple (single text field) or Structured (street, city, zip code as separate fields). |
| Number of occupied slots | How many slots the booking occupies. | Useful for events like birthday parties where one booking takes multiple spots. |
| Identification (birth) number | National identification number. | Region-specific field. |
Business fields
These fields are used for business invoicing. When one or more business fields are active, the booking form shows an option to register as a company. See Business booking for the full workflow.
| Field | Description |
|---|---|
| Business name | Company name. |
| Business address | Company address. |
| Business ID | Company registration number. |
| Tax ID | Tax identification number. |
| VAT | VAT identification number. |
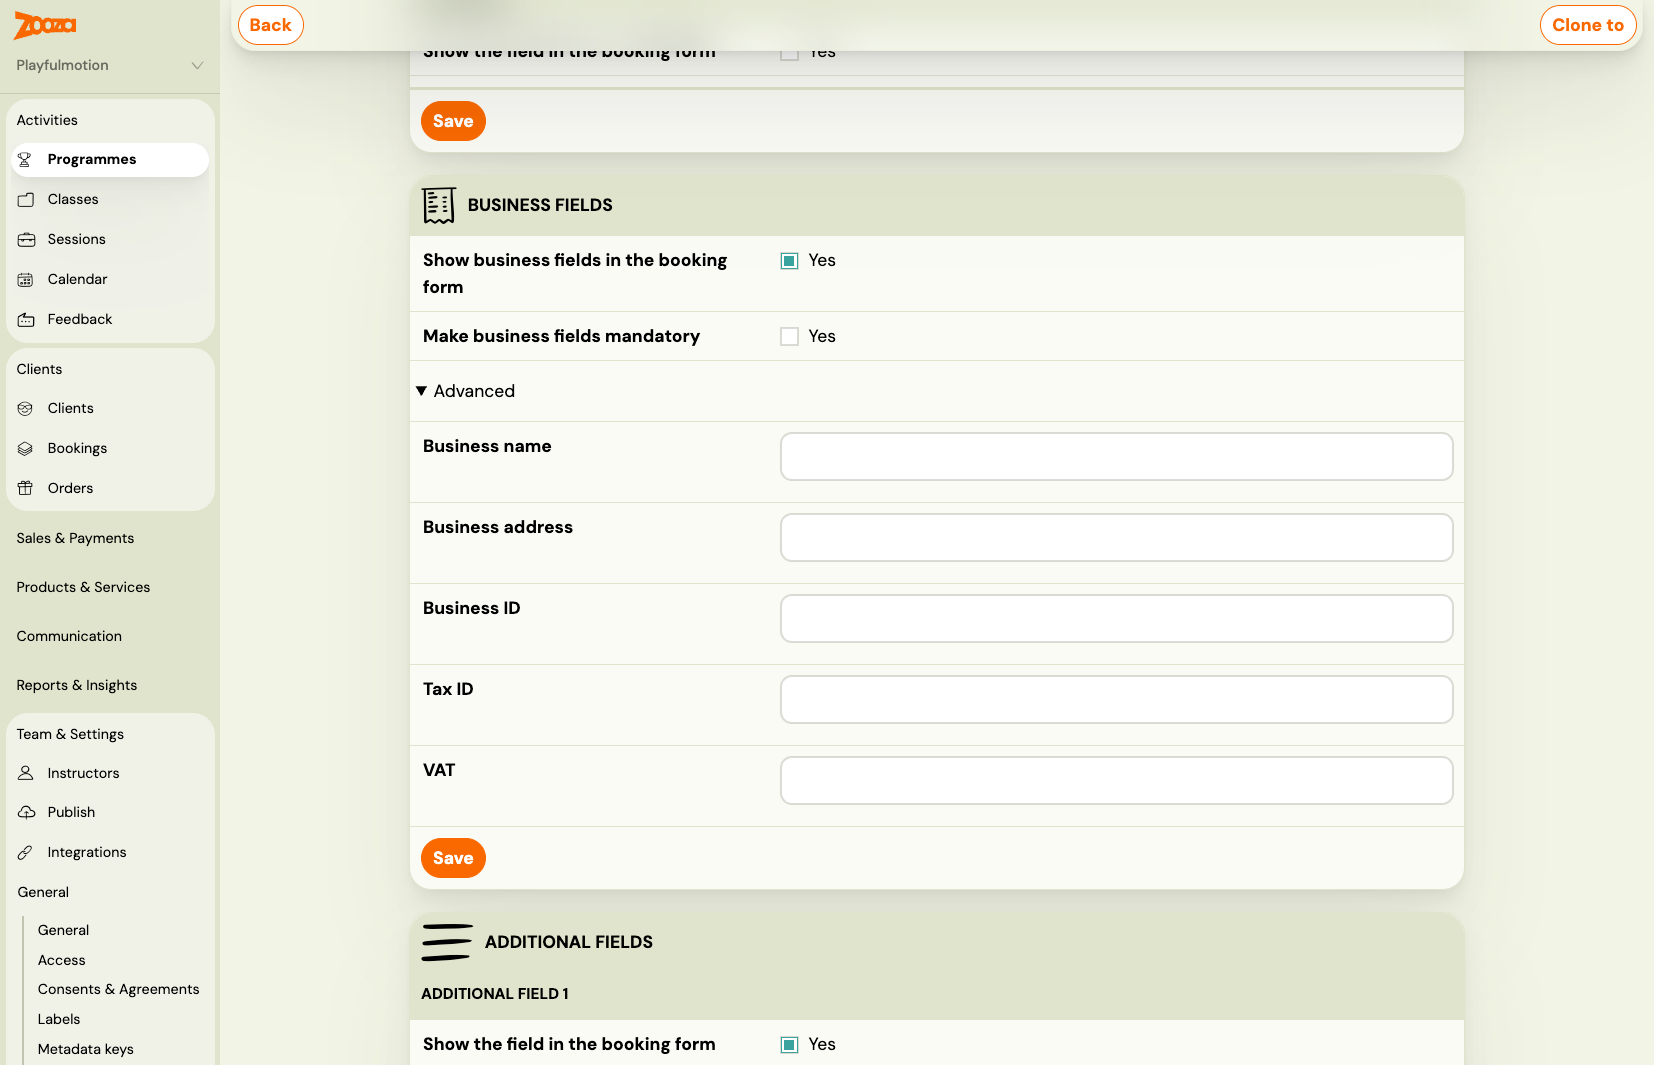
Buyer-only fields in multi-person registrations: When multiple attendees are registered in one booking, address fields (Address, Structured address) and all business fields (Business name, Business address, Business ID, Tax ID, VAT) are collected once on the buyer card — not once per attendee. The booking widget groups them under the buyer section automatically; you do not need to configure this. Mandatory validation for these fields applies once per booking, not per person.
Custom fields (Additional field 1–15)
You can add up to 15 custom fields. Each custom field has:
- Name — the label displayed on the booking form (required).
- Type — Text (free-text input) or Choice (dropdown picker).
- Mandatory — whether the field must be filled in before the client can submit the form.
Choice fields (key-value picker)
When you select the Choice type, you define a list of options. Each option has:
- Key — a short code used in data exports (e.g.,
beginner,intermediate,advanced). - Value — the text displayed to the client on the form (e.g., "Beginner", "Intermediate", "Advanced").
This is useful when you need structured data for reporting — the key ensures consistent values in exports regardless of the display text.
To configure a choice field:
- Set the field type to Choice.
- Click Add option.
- Enter the key and value for each option.
- Repeat for all options.
- Save.
Hiding or disabling a field
To remove a field from the booking form without deleting it permanently:
- Go to Programmes → select the programme → Edit Settings → Additional Fields.
- Uncheck the field you no longer want to display.
- Save.
The field disappears from the booking form immediately. Existing bookings that already have data in that field keep their values — the data is not deleted, just hidden from new registrations.
To hide a custom field (Additional field 1–15), simply clear the field's Name — a custom field with no name is not shown on the booking form.
Note: Fields are configured per programme. If you want to hide a field for one programme but keep it for another, change the setting on that specific programme only.
Editing field values on existing bookings
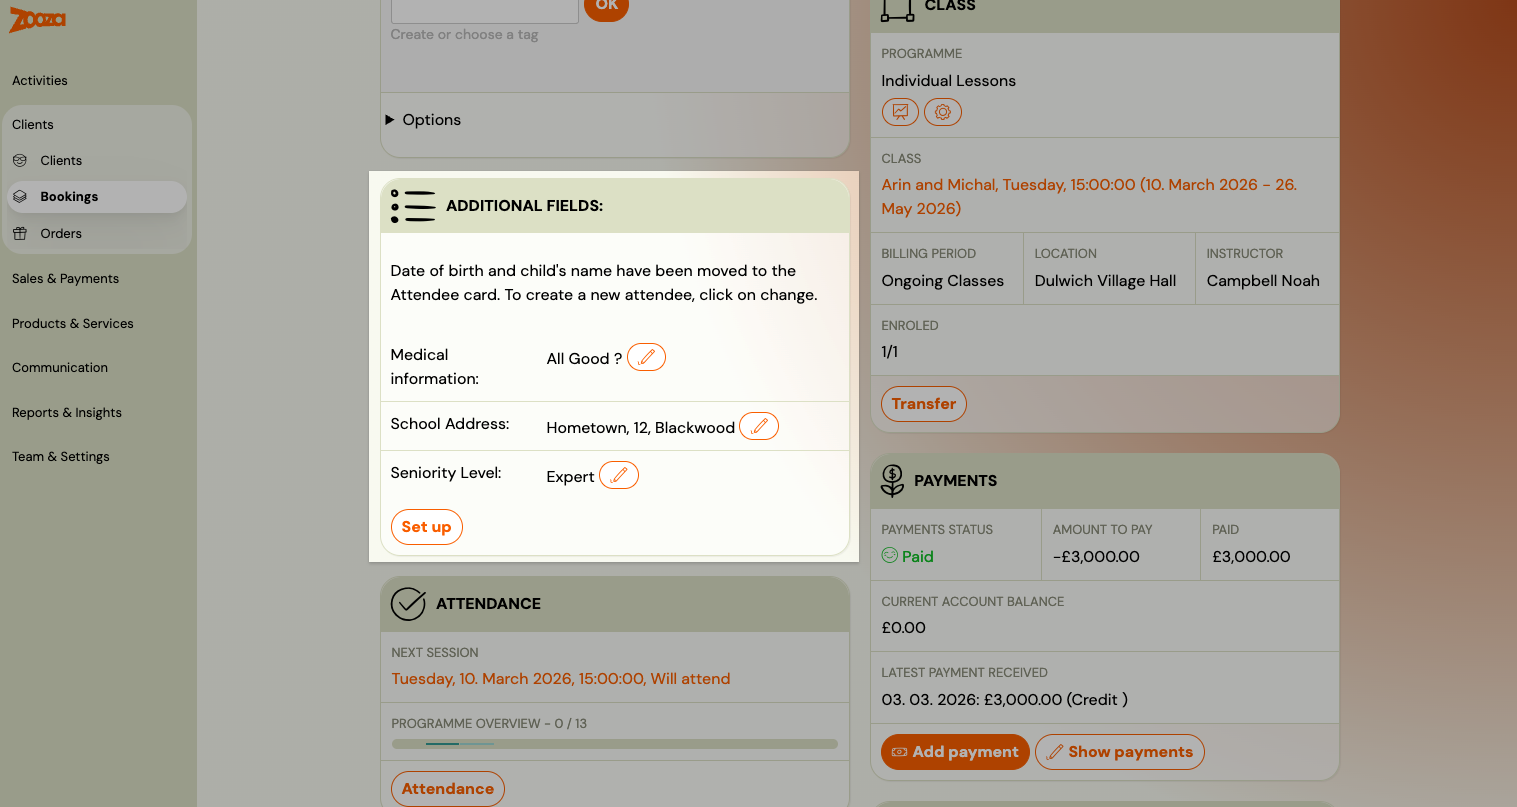
After a client registers, you (as admin) can edit the values they entered in the additional fields:
- Open the booking detail.
- Find the Additional Fields section.
- Click the edit icon next to the field you want to change.
- Update the value and save.
Clients cannot edit these fields themselves after submitting — only admins can change the values.
Age restriction
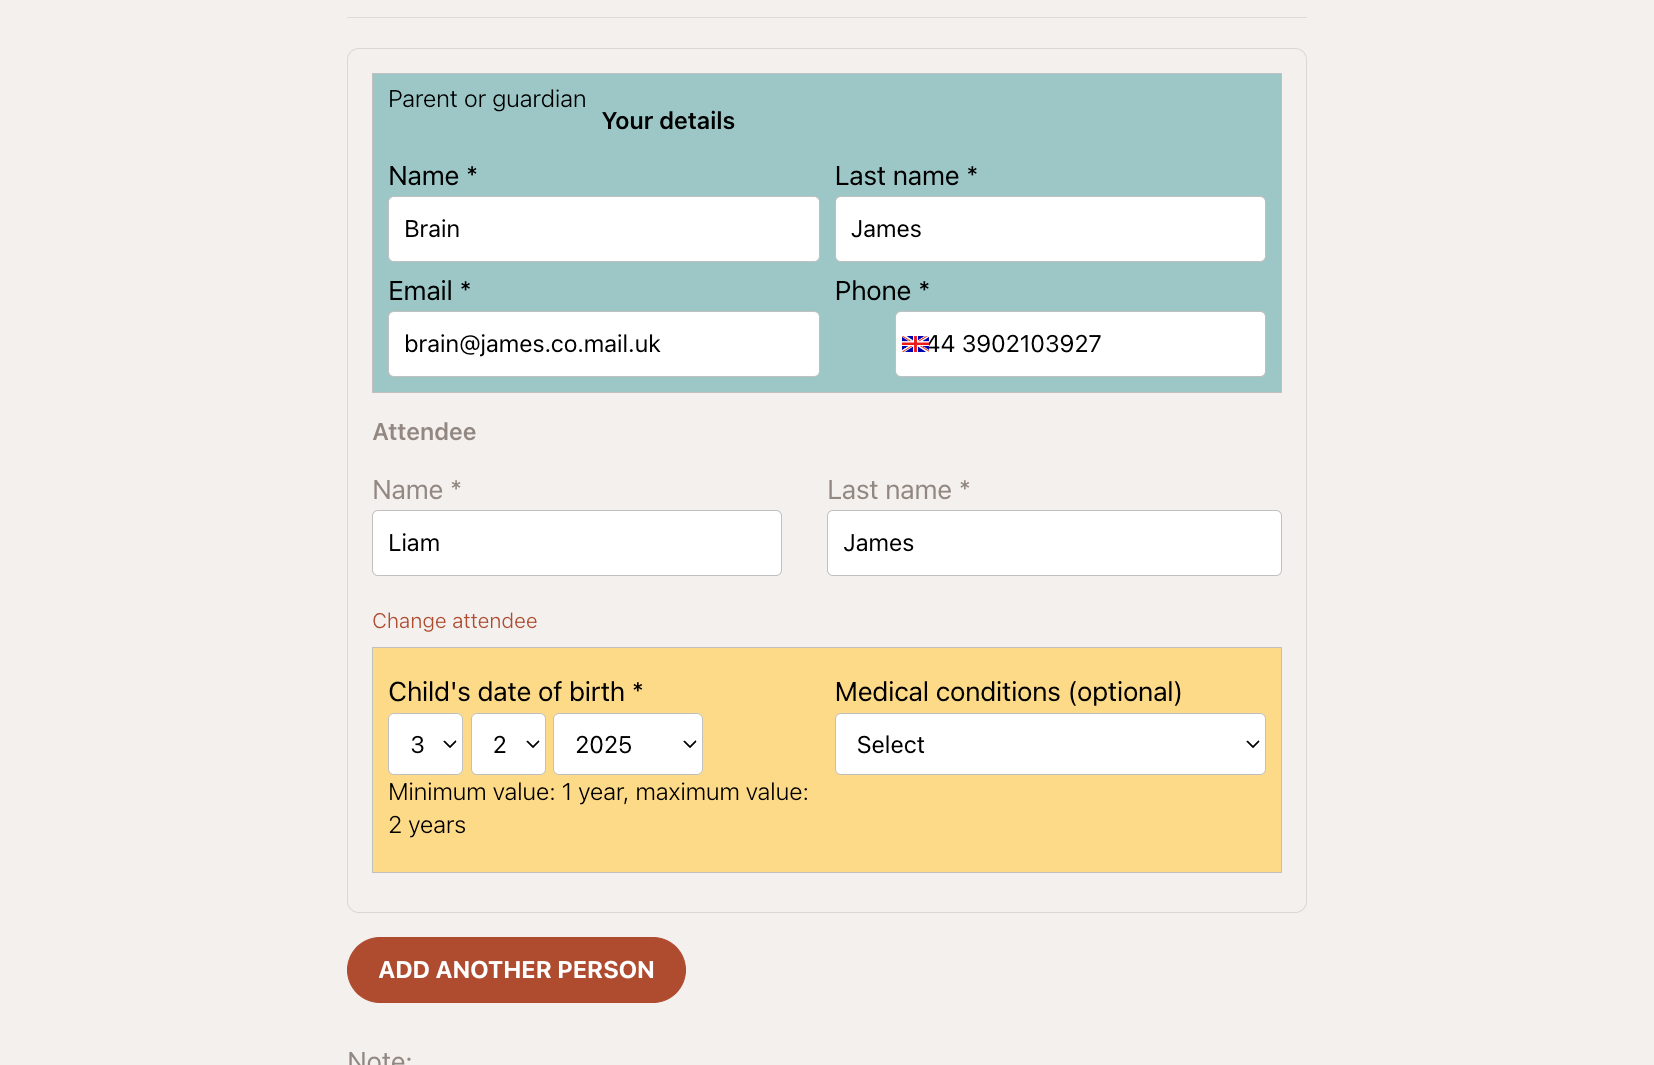
The date of birth field can be used to restrict bookings by age. When enabled, clients whose child does not meet the age criteria cannot complete the booking.
Setting up age restriction
Turn on the Date of birth field first — the restriction hangs off it. You can give the field your own Custom name ("Child's date of birth") and make it Mandatory, which you want if you are going to restrict on it.
Then, under Restrict programme booking based on age:
- Type of restriction — No restriction, By date of birth, or By age.
- By age — the limit in months or years. Months are the better choice for baby and toddler programmes, where "2 years" is too coarse a band.
- By date of birth — the earliest and latest date of birth allowed. Use this for school-year intakes, where the cut-off is a fixed date rather than an age. The helper text under each field spells out which way it cuts: persons born before the minimum, or born after the maximum, cannot enrol.
- Method of using restrictions — Both, Minimum value only, or Maximum value only. A programme with no upper limit only needs a minimum, and you must pick here even if you filled in both dates.
- Exceeding the age limit — the important one, see below.
- Save.
Both methods end up as the same thing internally — an age band in months — so they are interchangeable. Pick whichever matches how you describe the programme to parents.
The restriction is evaluated against the child's date of birth at the moment of booking. A child who is too young today is refused today, even if they qualify by the time the class starts — which is what Allow below is for.
Refused outright, or sent to you for approval?
That is decided by one setting: Exceeding the age limit.
| Setting | What happens to a child outside the age band |
|---|---|
| Not allowed | The form refuses the booking. The parent sees a message explaining the restriction and cannot continue. |
| Allow | The booking goes through, and you decide afterwards. |
Choosing Allow opens two more controls, and they are what make it workable:
- Set status In waiting list for these bookings? — put every out-of-range booking straight onto the waiting list, so it lands in your queue instead of enrolling silently. You then approve or decline it by hand.
- Set a label for these bookings? — tag them, so you can find them later without remembering which is which.
This is the setup for "we do take children slightly outside the band, but we want to look first". A child who turns four next month is the usual case: they book, they wait, you enrol them when they qualify.
The general class waiting list is a different thing. That one queues people when a class is full. This one queues them when they are the wrong age, and it only exists if you set Allow. Both can be on at once.
Dynamic tags for additional fields
Additional field values can be used in email templates via dynamic tags. This lets you personalise confirmation emails and other communications.
| Tag | Field |
|---|---|
*|EF_DOB|* | Date of birth |
*|EF_FULL_NAME|* | Full name |
*|EF_CITIZENSHIP|* | Citizenship (ISO country code, e.g. SK) |
*|EF_ADDRESS|* | Address |
*|EF_BUSINESS_NAME|* | Business name |
*|EF_BUSINESS_ADDRESS|* | Business address |
*|EF_BUSINESS_ID|* | Business ID |
*|EF_TAX_ID|* | Tax ID |
*|EF_VAT|* | VAT ID |
*|EF_EXTRA_FIELD_1|* – *|EF_EXTRA_FIELD_15|* | Custom fields 1–15 |
The number is the slot, not the name. Custom fields sit in numbered slots — Additional field 1 through Additional field 15 — and the tag follows the slot. Naming a field "Allergies" does not give you an EF_ALLERGIES tag; if it sits in the second slot, its tag is *|EF_EXTRA_FIELD_2|*.
So if a tag comes out empty, check which slot the field actually occupies in Programmes → programme → Additional Fields. That is the most common reason a custom-field tag renders nothing.
For the full list of dynamic tags, see Dynamic tags.
Server-side validation of mandatory fields
Mandatory additional fields are enforced on the server when a client submits a booking through the widget. If a required field is missing, the registration is rejected with an error and no booking is created.
This means that even if a widget integration is outdated or a custom-embedded form does not visually enforce the fields, the server will still reject incomplete submissions. Clients see an error and are prompted to fill in the missing information.
This affects operators with custom or embedded booking forms. If you have built a custom integration using the Zooza booking widget, make sure your form collects all fields that are configured as mandatory in the programme settings. Submissions without those fields will be rejected.
Admin bookings are exempt. When an admin creates a registration directly in the Zooza app (not through the widget), mandatory field validation is not enforced — the admin can save a booking even if some additional fields are missing. This allows back-office data entry without friction.
What additional fields look like on the form
When additional fields are enabled, they appear below the standard booking form fields (name, email, phone). Business fields appear in a separate section that is shown when the client selects the "Register as company" option.
Custom choice fields appear as dropdown menus. Mandatory fields are marked with an asterisk (*).
Related
- Programme Settings Reference — full field reference for the Additional Fields tile.
- Business booking — registering bookings for companies.
- Customizing widgets — how extra fields appear on the booking widget.
- Dynamic tags — using field values in email templates.
- Allowing multiple booking — collecting data from multiple attendees.
- Personas — how Personas replaces extra fields for attendee tracking.